Objective: make a room in layers but with multiple Pre-requisites:
Completion of previous lessons recommended - extrude function. |
This
is part 4 in a series of in-depth tutorials by Sirian.
Thanks to Sirian for allowing us to post these lessons. |
|
|
LESSON FOUR - The Sirian Method - Combining Multiplanar Extrusions |
||
|
Now we're going to venture into the land of the T-Joint and (I hope) come out unscathed. Once you start extruding along different axes and combining the results, you are destined to make T-Joints and bad shells unless you take GREAT pains to avoid them. And since you can't easily fix T's in the 0.9 editor, then you will want to avoid T's at ALL costs in that version. In current versions you can add verts to a face and its edges, allowing you to fix T's, but this still takes work and some expertise, so I'm going to show you a way to do this without making any T's. Let's start with the vert pattern you will need for portal containment. Let's make a room with four portals to be attached to it: one on the west wall, two on the north, and a dogleg extension to the south which will lead to another portal. We're going to be combining the previous lessons, where we make a room in layers but with multiple extrusions coming from different directions. Start with the containment pattern in the "primary" layer: 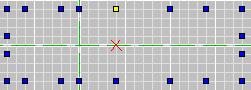
Now the key to avoiding T-Joints is to mirror your verts. If you only need a vert on one side, fine, but you have to place an opposite vert on the other side even if you don't need it. I want to place a portal between verts 2 and 3 and also between 6 and 7 on the north wall, a narrow portal in the middle of the west wall, and a portal between verts 4 and 5 on the south wall. So technically, I don't verts 4 and 5 on the north wall, nor 2,3,6,7 on the south wall, but I had to mirror them, on each wall. You'll see why in a moment. Note that this a 10 grid, and that I panned out to a wide view so the whole thing could be seen at once. So figure every 2 grid points represents 20 distance, which is the size of a texture bitmap. If you work in 20 unit blocks, you've got easy texturing. Where you start doing off-angle work, you'll have to align your textures or the level will look like crap. 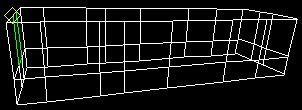
In this shot, I have inserted the start face, extruded upward 40 units, flipped the floor and extruded down 20 units to make a second layer underneath. After deleting the seam between the layers, I have the "body" of the room completed, and I am done extruding from the Top (XZ) view for now. Now it's time to move to the Side (ZY) view and start preparing for extruding from that plane. At this point, we NEED to be working with the coordinate cursor (the red X) and to maintain a high awareness of our location in all three dimensions. 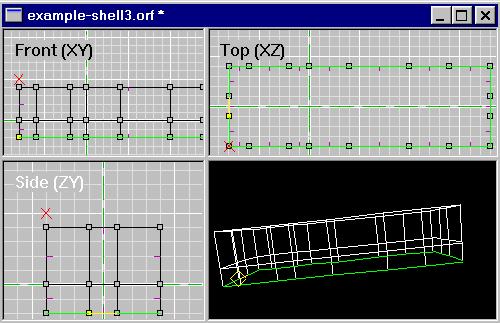
This is a view of the cursor having been moved to the exact coordinate where I will begin placing new verts. You need to move the cursor to the correct width and height in the Side (ZY) view, and then eyeball it in one of the other 2D views to check the depth. If you are NOT at the right depth, click on one of the other windows and move the cursor with Ctrl+ArrowKeys. IMPORTANT NOTE: Clicking in an active window *moves* the cursor. Clicking in a nonactive window merely activates that window. So you have to keep an eye on which of the 2D views, if any, you have active. Trust me, if you don't already know, you'll soon find out the frustration of accidentally clicking the wrong place at the wrong time and having to manually reset your cursor location again. Once the cursor is at the right grid point in all three dimensions, you need the Side (ZY) view active, because for the next step that's where we're working. Insert vert, Ctrl+Arrows to move cursor to next spot, Insert vert, repeat. You know the drill. Only now, you can't get away with fudging and using the mouse: you *have* to use the cursor because we are no longer working at the reference frame. (Resetting the reference frame for small stuff like this is not really worth it, IMO -- can cause more trouble than it fixes). 
This picture shows the completed pattern faces. And you can see in the 3D view that they are aligned with the west wall at one end of the room. I have them split apart so you can see each face individually. Normally you don't have space between them like that. Next you have to check their normals, make sure all are pointing the right way, then it's time to do a layered multiple extrusion, combining what we covered in the first two lessons. On the current editor you can extrude all 5 of these faces at once. On the old 0.9 version, you must do the extra work of extruding them one at a time, and in this case you *MAY* want to actually separate the faces like I did for example purposes, to easier keep track of what your progress is. 
Here you can see that I've done two levels of the extruding. You *have* to match the extrusion depth with the verts on the walls of the room "body". That's the secret to avoiding the T-Joints: lots of planning. If you extrude past a wall vert, you've got a T. If you extrude to a length where there is no wall vert, you've got a T. If you extrude the length of the room in one shot, you've got a boatload of T's. You just can't afford that in 0.9 Now the actual steps of doing these extrudings are the same as I showed you in earlier lessons. You unmark all faces, then mark the ones you need to extrude, flip them if necessary, extrude the proper length, and repeat, until you've marched across the length of the room. Note that you can easily mark the whole group of faces from the Top (XZ) view, just click and drag, and no danger of accidental markings unless you get really really sloppy. Also note that in the shot, I have the next group of faces marked and ready to extrude, and they have already been flipped (see the normals?) 
Here you see what it looks like when the extruding has been done. Now we need to go and delete all the seams, and we'll have to do that in two steps. 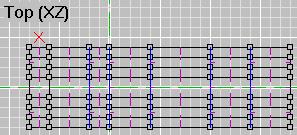
Here I've marked the seams that can safely be marked in the Top view. There is one that isn't marked, but that's the one I already deleted earlier. Time to delete these. 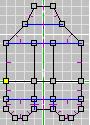
And here you can see the remaining seams, which are marked in the Side view. Once these are deleted, we'll have completed this stage of the process. Now it's on to that dogleg section I mentioned earlier. We're going to be extruding along the Front (XY) view for this stage. However, this time we are not going to make new faces to extrude from, but rather use existing faces that are part of the south wall. These faces need to be marked, then flipped, then the extrude can take place. Like this: 
After the extrusion, you need to delete the seams. There aren't many, but you can switch to textured view and look around to make sure you didn't miss any. Now we have a shell, and despite the fact that we extruded from 11 different faces in three different planes, we've got NO T-JOINTS AT ALL. This is the "Safe" way to conduct complex operations with the Sirian Method -- the only way to do it at all in version 0.9 NOW that all the shell faces have been created, and all the seam faces inside the space of the room have been deleted, NOW is the time to Remove Extra Vertices so that all those edges on all those faces will be merged, and your shell will become airtight! In fact, it's necessary to merge the verts now so we can proceed to the next step. And what is the next step? Choosing a texture scheme and then combining faces where possible to reduce the room's poly count and improve framerate performance. The reason you have to choose the texture scheme first is because it's a royal pain to have to split a face you shouldn't have combined. Texture the room, then see what faces you can safely combine, accounting for both your textures and for portal containment. Here's what I came up with, after about 7 minutes of joining faces: 
And in textured view: 
Again, this is the "Safe" way to combine multiplanar extrusions, the only way to do it without creating T-Joints. In the next lesson, I'll show you the "Fast" method, which the method I actually use. It creates some T's, sometimes a lot of them, which then have to be repaired; but since the current editor allows for them to be fixed, I just move quickly and go back to clean up the T's later. - Sirian |
||