Objective: To build complex rooms by extruding multiple faces Pre-requisites:
Completion of previous lessons recommended - extrude function. |
This
is part 3 in a series of in-depth tutorials by Sirian.
Thanks to Sirian for allowing us to post these lessons. |
|
|
LESSON THREE - The Sirian Method - Multiple Extrusion |
||
|
Sometimes you just can't make the shell you want with a single floor or wall face. So you have to use multiple faces. This is a dangerous process if you don't know what you are doing, in the sense that you can create T-Joints left and right, and fill your level with errors. You always want all your room shells to be airtight and error free to eliminate the risk of crashes or other problems during games. So let's go through the process of making an error-free shell with multiple extrusions. You have to plan carefully so that you don't create any T's, which will leave holes in your shell. Check out this vertex pattern.  Now I'm going to make the other faces separately, just to show the pieces and how you have to match up the verts and the edges.  The reason you have to do so many of these faces to get this room shape is because you cannot have any concave faces. So you have to think of the shape you want, then break down the floor into as few faces as possible without having any of them be concave. Also note the yellow edge on the current face: that edge HAS to match exactly with the pentagon face's edge, because that will be a shared edge on the floor, and unless its an exact match, you've got T's and a bad shell. Now I'm going to move all the faces together into their proper places and extrude. (On another note, see the grid? That's a 10 grid, not a 5. You can zoom out on the grids, by panning with the mouse, if you need to see your whole room, and you can zoom in really close if you are working with tiny grids and can't see what you are doing.) In current versions of the editor, you can extrude from all these faces at one time, by clicking "Extrude from: Marked Face(s)" in the extrude dialog. Then bang, it will extrude them all in one shot, to the same length. If you are still working with 0.9 beta version, you will have to extrude them one at a time. Here's a look after extruding. 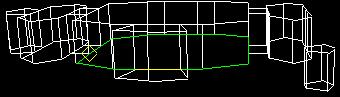 Do you see the block on the far right? It extruded DOWN instead of up. Oooops. Don't let this happen to you! Make sure you always lay your floor verts in a COUNTER-CLOCKWISE circuit when making floor faces, so your normals always point up. And check before you extrude to make sure you remembered, and that no normals are pointing downward. If by chance you do have one or more pointing downward, then you've got to unmark ALL the faces, mark the ones that are facing wrong, flip them, then remark all the floor faces. Yum. It's also a good idea to NOT "combine" your verts prior to extruding. There's plenty of time to do that once the shape is right. If you combine the verts, you can't move the extruded blocks around independently. They will have been attached, and moving one will cause distortion in others, like this:  Now in current editor versions you can move marked faces around in face mode. So that move COULD have fixed the problem you see here IF the verts hadn't been combined. So don't go removing duped verts until the shell is done, THEN do it. And don't forget to! You can cause massive errors if you fail to combine verts to seal up those shared edges! Now let's look at the room as it is meant to be: 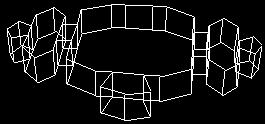 We are not quite done yet. There are some faces between the segments that need to be removed to open this thing up into a single area. You can do this best in top view. First make sure you are in face mode, then unmark all faces, then use the mouse to click and drag over JUST the faces you need to remove. Do it along each seam, one seam at a time. When you have all the seams marked, it should look something like this: 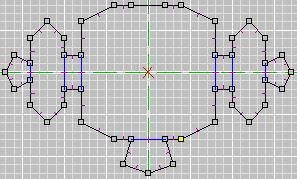 Make sure you didn't accidentally mark any of the soon-to-be shell faces. You only want to delete the seams between extruded segments. Once they are all marked, press the delete key or choose Delete from the Edit menu. NOW your shell is done, and you should Remove Extra Verts to seal all the edges. And there you go: a non-bland non-boxy room made entirely with Extrude.  Texture as desired. Then your shell is complete and error free, and you can begin to populate it with nonshell faces. ------------------------------------------ One other note: This example room is *JUST* an example. I would not actually DO this layout this way if I wanted to use this in a level. Rather, I would have this be three rooms, since those wing areas on the sides will not have line of sight to most other rooms. Those should be rooms unto themselves. So this example room should actually be three rooms: the middle and the two wings. And this would save you a little time, as well, because you could do just one of the wings as its own room and use that room twice when you assemble all your ORFs to make the D3L. Now that's not the main reason to break this into three rooms. The main reason is because that would be best in terms of the Vis table and the game engine, and optimizing your level's performance. But the fact that it would also take less work is a nice bonus. I hope this lesson has been valuable in showing you how you can use extrude to do more than make simple boxy rooms, as well as how to do it without creating errors. Next lesson: multiplanar extrusions. More to come... ADDENDUM - Texture Alignment With the 0.9 beta editor, texture alignment is a tedious process. You will have to align the faces manually, one at a time, if you need to realign things once you're done extruding. One thing you can do in this case is a simple step by step process to cut down on the work: 1) Select a face to align 2) Click the middle button to reset the face to "default UVs" (this eliminates the warpy twisty effect you get when you move the verts, or when you bend - if you don't want the textures bent with the verts, you have to reset them afterward). 3) Align the texture, eyeballing it in the 3D view in textured rather than wireframe. Take note of the U and V numbers. 4) Go to a similar face that needs to be aligned the exact same way, reset UVs with that middle button, then enter the numbers from the original (the numbers you noted). This face will now match the first one you did. 5) Repeat as necessary. ------------------------------------------- In the current editor, there are all sorts of alignment tools you can use. Here is how to use them. Align Current or Align Marked: this is a toggle. Align Current aligns only the current face. But you can do the process I mentioned above for 0.9 in a faster way now: you can mark all the particular faces that all need the same sort of realigning, then toggle to Align Marked and as you align one, it aligns them all. Neat, huh? You can use the Align Marked to reset UVs on an entire room in just moments: mark all faces, reset marked, unmark. Bang: you're done. No more wavy dancy bubbly warping textures all over the place (if you like to move verts around a lot). Align Marked to Current: you can align a whole strip of faces at once (for example, all the walls in a layer of a room: say you have plenty on non-20x20 faces and you want it to look professional...) So what you do is pick a "source" face, mark all the ones you want to have realigned to it, and then click on the source face so it's current, then click Align Marked to Current. It will realign all the marked faces so everything looks smooth. All the marked faces have to be adjacent, though, sharing common edges. Control-Click: you can manually realign textures in the 3D view, in either Textured mode or Textured With Outline mode (I prefer with outline, personally). You select the source face as your current, then you Ctrl-Click on an adjacent face (sharing an edge with the current face) and the adjacent face texture will be realigned with the current face. It will then automatically make the newly aligned face the current face, so that you can go around a whole room, or wall, or floor, or lathed object, or whatever, in fairly rapid fashion, eyeballing it the whole way and SEEING the changes in real time as you go. THIS IS AN AWESOME FEATURE! Make sure you know how it use it, as its power is staggering. You can even Ctrl-Click across rooms. Sadly, you cannot do it between ORFs, but you can do it across rooms in an assembled D3L... allowing you to align whole floors and ceilings and walls in your level. I tested this feature extensively in "Divided We Fall" and Gwar commented after he saw it, "That's going to set a whole new standard for texture alignment." The reason this is part of lesson three is simple: those floors and ceilings in the example room are misaligned. In 0.9 that's a real hassle, but in the current editor you just do a couple of Ctrl-Clicks and it will look seamless. Soon these tools will be in your hands. - Sirian |
||